Thursday 4 April 2013

Continuous Delivery : Part 1: What is it?

So this is the first in a series of continuous delivery blog posts that we hope you can use for inspiration and guidance or toilet-paper whatever your need.
Through the series, we’ll go the whole way, from describing what continuous delivery is, through what tools to use and why, to creating your development environment, and all the way to automating your delivery and collating metrics. 
Any examples will be by reference to a  scale-able REST JSON public service API and the problems and issues we’ve had to solve along the way.

PICTURES PLEASE

You might be using continuous integration in your workplace or at home, and it may be something you are familiar with.
Chances are CI works really well within your team, and on your project, but doesn’t work so well across all projects, and probably sucks between departments, particularly as your development moves towards being released in front of customers.
Software development paradoxically is an industry where the standard production line to deployment becomes progressively more manual the closer you get to the customers.
This is such a waste of time and money.
There are some great books on the topic of CI and its bigger and bolder brother Continuous Delivery which attempts to address the problem above.  Here we’ll pick out Jez Humble and David Farley’s epic Continuous Delivery for background reading, but as with most things, you haven’t got time, its a big topic, so we’ve tried to explain it in pictures.

development RELEASE phase

Here is a picture for an idealised development release phase for a complicated project with lots of technologies.
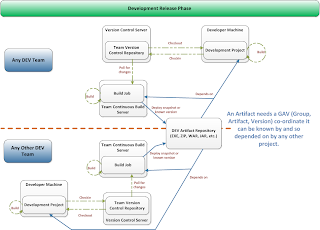


On a complicated project, there may be many different parts to the overall project.  The process may differ from team to team and technology to technology, but a few key pieces can be observed in any process and for any technology that need to be common:
  1. All pieces of a complicated project should be under version control, hence the team version control repository
  2. Each piece of the complicated project should  be built centrally on the team’s continuous build server so all changes get batched up and built as part of the normal process of continuous build or continuous integration (see Continuous Integration)
  3. Once successfully built, the artifact (JAR, EXE, ZIP, GEM, RPM, whatever) that is the product of a build should be deployed to an artifact repository that is visible to all teams under a known set of GAV co-ordinates (Group, Artifact, Version) so that something further downstream (closer to being in front of a customer) can depend on (so download) the built artifact as part of a larger whole.
So.  We’ve got lots of teams building different parts of a solution at known versions to an artifact repository, but what about the solution as a whole, as none of the individual bits of solution can be released to being in-front of a customer, only the whole can?
This is where the second picture comes in.

Product release phase

Any moderately complicated solution is going to be made up of many different parts, software, hardware, configuration, and supporting 3rd party applications.
What often happens if you work in a place where there is a separation between development and any other part of the business (a.k.a the usual hell), is your artifact that is only a small part of the overall solution falls off the end of the development conveyor belt, crashes to the floor, and is at some indeterminate point in the future is swept up and taken on by people who may have never seen it before, and have no idea what to do with it.
Sound familiar?
The result of this lack of departmental collectivism is as a general rule, chaos, panic, bad blood, all of the above, particularly as product release time nears.
So things need to be joined up don’t they?
Here is a picture of what could happen after the development release phase of each component part of a solution or product:
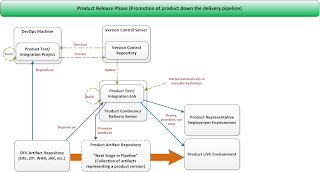


The solution or product is made of constituent parts at known versions.  This bundle of parts can each be pulled from the DEV artifact repository, and can be expressed as a file with a known version of its own (a Maven POM anyone?) so long as that file is accessible to external systems by GAV co-ordinates too.
This bundle moves through certain stages towards delivery.  These are the stages in a deployment pipeline, such as automated acceptance testing, automated performance testing, durability testing, whatever stages you (as you are in control aren’t you?) want to include in your pipeline.
Note a few observations can be made here:
  1. If DEV don’t become more OPS, then you are in trouble.
  2. If OPS don’t become more DEV, then you are in trouble.
  3. The Product Artifact Repository needn’t be the same as the DEV Artifact Repository.  The Product Artifact Repository refers to bundles (expressed as products) that move down a pipeline, so if we need to get pointy-headed about security, we can do it here if we so wish
  4. To move through a stage in the pipeline, a bundle gets deployed, provisioned, and tested on a representative deployment environment using the tests that “fit” with that stage.  If it passes, it gets moved down the pipeline, otherwise it doesn’t.
  5. Moving down a pipeline could mean many things, logically promoting a given bundle to a new state following completion, actually copying bundles of stuff from one location to another (I don’t recommend this), doing a combination of the both.
  6. Eventually the bundle makes it to a staging environment, and its done everything but go live.  You do canary releasing right, and you’ve got in-flight upgrades sorted right? No? Never mind we’ll cover those in later posts, as ideally, you would want to automate your migration from an old version of your solution to a new version of your solution, all the way to live, without your customer even noticing it.
  7. So, now we are live.  What if no-one wants the solution? What do you mean you’ve got no metrics that tell you what is used, and if its used? Are you used to burning money? A principal aim of Continuous Delivery is, do it regularly and do it in small increments. So, if the real metrics tell you no-one wants your brilliant new or planned feature, then its not a fiasco, and don’t keep it, bin it. But bin it on the basis of actual user feedback not on the basis of imagined need.

Conclusion

Hopefully the pictures set the scene enough to begin the conversion within your own organisation, and set the scene for the posts to follow.  
In our opinion, the biggest two obstacles to the widespread adoption of Continuous Delivery are politics, and short-termism.
If you aren’t doing Continuous Delivery already, you can bet your life either your competition will be, or are currently thinking of doing it soon. So get a move on before your politics and short-termism kill you as a competitive business.
In the following series of blog posts we’ll investigate what it all means, and how you actually do it.
Enjoy.
The next blog post will be on the basic toolkit we found we needed and why …

Tuesday 12 March 2013

Coming soon …

It has been far too long.  The next series of blogs are are going to cover things I’ve learnt about REST and about HATEOS for mobile:

  1. Custom XML handling for REST services using your own content handler
  2. Custom JSON handling for REST services using your own content handler
  3. JSON validation using JSR 303 and XML validation using auto-generated XML schemas
  4. Super fast writes with a persistence layer
  5. Memcached clients in java and getting over the 2,500 calls a second barrier on an all-in-one solution.
  6. Using SNMP4J to alert the outside world
  7. Modular development and maven plugins
  8. The REST APIs for Nexus and for Jenkins
  9. Continuous Delivery

Phew …

Its been a while

Saturday 12 July 2008

Primary Keys that mean something in Rails

I like Rails, I really do, but you like me may need to migrate a data-model that doesn't use locally generated integers as the primary keys (PKs) of entities.

Rails, by default, seeds model (entity) data with unique identifiers it uses as PKs from database specific mechanisms (say serial columns in PostgreSQL).

Personally, I think locally generated integers used as identifiers for "things", are most poor for two main reasons:

  1. They don't scale.  Your local postgreSQL instance may just be part of a wider data architecture.  If you use locally generated PKs as Rails will get you to, you'll clash with other locally (but possibly the same value) PKs from other local DBs when synchronization with the "master" takes place.  If you don't know what I'm talking about then go look at scaling databases, its not just a postgreSQL issue.  If you really really have/want/need to use an identifier, then there is a good article of using Universal Unique Identifiers (UUID) for IDs at GUID-as-Primary-in-Rails although the article doesn't follow through on how in precise detail, so we'll cover that in a later blog.
  2. They don't mean anything.  Say for example you have an entity type HillType, whose PK should really be a unique and meaningful name.   If you really wanted to find out about the details of a HillType of name gnarly you'd want to enter a RESTful-like URL of http://localhost:3000/hilltypes/gnarly.  You really wouldn't want to know the mapping between "gnarly" and some internal ID that Rails generated for you via a DB sequence.  Yes, I know there are ways of RESTfulizing the internal ID to some other attribute on the model/table, but avoid the complexity in the first place, and under-populate your database with data it actually needs to be readable by people not frameworks.

So ..........  After those contentious points, how do we do it?

Three steps to RAILS CRUD with meaningful PKS

1) Unfortunately, I've not found a way round of avoiding an integer PK in Rails, unless either you specify your migration without a PK, or you avoid the Rails meta-DDL completely and go native in your migration as in here:-

class CreateHillTypes < ActiveRecord::Migration
  def self.up
      # -------------------------------
      # This is postgreSQL specific DDL
      # -------------------------------
      execute <<-EOF
        create table public.hill_types (
            typename varchar(255) not null unique,
            description varchar(2000),
            primary key (typename)
        );
      EOF
  end

  def self.down
    drop_table "hill_types"
  end
end

2) We also need to ensure our Rails "knows" we've provided a non-standard PK, so we need to amend our model:-

class HillType < ActiveRecord::Base
    set_primary_key "typename"
end

3) Next we need to amend the templated controller that script/generate scaffold HillType generated for us to avoid attempting to mass-assign what is now a protected attribute (typename) on our model.  So, on the create method Rails makes for you by default in your model controller, you'll need something like:

def create
      @hill_type = HillType.new
      got_details = params[:hill_type]
      @hill_type.typename = got_details["typename"]
      @hill_type.description = got_details["description"]
      respond_to do |format|
          if @hill_type.save
              flash[:notice] = 'HillType was successfully created.'
              format.html { redirect_to(@hill_type) }
              format.xml  { render :xml => @hill_type, :status => :created, :location => @hill_type }
          else
              format.html { render :action => "new" }
              format.xml  { render :xml => @hill_type.errors, :status => :unprocessable_entity }
          end
      end
  end

That is it.  Go gambol in the fields of  meaningful URLs, and leave out meaningless framework convenience identifiers from your models, they are embarrassing.

Thursday 3 July 2008

Rails, XHTML and using your own CSS styles

Got to migrate your CSS and your standard layouts to rails? Read on ......

A Ruby on Rails (RoR) app holds three key locations you'll need to know about to re-use your imagery, your Cascading Style Sheet (CSS) look and feel, and your standard layouts.

  1. <project_name>/public/images: Put your logos and your bits and pieces in terms of iconography in here.
  2. <project_name>/public/stylesheets: Put your CSS files (holding all your standard page styling) in here.
  3. <project_name>/app/views/layout/application.html.erb: This is where we can define our standard layout to apply for our pages.

Standard Layout

So, for example, my application.html.erb looks like this:

<!DOCTYPE html PUBLIC "-//W3C//DTD XHTML 1.1//EN" "http://www.w3.org/TR/xhtml11/DTD/xhtml11.dtd">
    <html>
    <!-- This is a standard wrapper for all view content -->
    <head>
        <meta http-equiv="Content-Type" content="text/html; charset=UTF-8" />
        <title>Sample Rails common layout wrapper</title>
        <!-- Include all our styles as pulled from styles.css -->
        <%= stylesheet_link_tag 'styles' -%>
        <!-- Include all the standard Rails javascript includes -->
        <%= javascript_include_tag :defaults -%>
    </head>
    <body>
        <div id="wrapper">
            <!-- The page content -->
            <div id="content">
                <!-- Standard header to page -->
                <div id="header">   
                    <div style="float:left; margin-top:15px;">
                        <a href="http://timepoorprogrammer.blogspot.com">
                            <img alt="" src="images/author.png" style="border-style: none"/>
                        </a>
                    </div>
                </div>
                <!-- The content that can we'll change dynamically later -->
                <div id="dynamicPanel">
                    <!-- Yield to whatever local content Rails expects -->
                    <%= yield -%>
                </div>
                <!-- Standard footer to page -->
                <div id="footer">Copyright &copy; 2008 me</div>
            </div>
        </div>
    </body>
</html>

There are a few things here:

  1. The doc type is xhtml.  If you open this up in Firebug or in HTML Tidy from your Firefox browser (get it if you haven't already done so), they'll both tell you this is a full on dynamic HTML page.
  2. The javascript_include_tag is embedded Ruby that ensures your pages include the standard JS files that come with RoR 2.1
  3. The style_sheet_link_tag points off to the public/stylesheets location where you put your CSS.
  4. The example img tag points off to the public/images location, yet doesn't need the public in the actual definition
  5. The <%= yield -%> marker tells RoR to put the content of your views you may have defined or will be defining (under  app/views/<controller_name> within the standard RoR structure) .

Now go restart your rails, and have a look at your views now, and bask in the fact that they'll be using your styles and common layout now.

Note: If you are puzzling over what app/views/controller_name means and aren't sure what the names of RoR files should be to express, say controllers, views, models, and how they relate to your RoR file naming conventions and URLs, go look at http://peepcode.com/products/rails-from-scratch-part-i for a particularly good introduction.

Rails and PostgreSQL for beginners

I've read a few blogs out there on using Ruby on Rails with the very excellent database postgreSQL.  But, I'd not found more than a do the installations and off you go kind of thing.  Given most of the online tutorials assume you click on "About your application's environment" to ensure all your rails malarky is working okay, I thought it sensible to tell you how.

Note: This blog assumes you have the free Aptana studio for RadRails installed, ruby installed on windows, both the rails and the postgres-pr gems installed for ruby, and you've got Postgresql up and running on your local box.  Honestly, there are
a load of online examples of installing Ruby, Rails, Aptana studio, and postgresql for Windows.  I'll not cover them here.

1) Start your postgresql server.

2) Create a directory.

3) Use Aptana Studio to point to this directory location, choosing postgresql as the DB of choice, and Aptana will create the basic sub-directory setup for rails you'll need. 

4) It will also start the rails server. 

5) About this time you'll choosing to view "About your application's environment" to find out what you've got.  This will fail.

Why?, well when you create a default rails project in Aptana Studio, or any other tool that creates the rails structures you get a default database.yml in your top level directory, that you can use to setup your DBs with this project.

But, its default content.

So ................

a) Shutdown your rails server from the Aptana Studio server's tab, or however else you do it.

b) Create a file called newdb.bat in your top level directory of your new project

Its contents should look alot like:-

    psql -h localhost -U postgres <db\create.sql
call rake db:migrate

This allows you to logon to postgres from the windows command line to create the databases the project requires as defined in an SQL batch file.

c) This SQL batch file is called create.sql in your local project db directory, which should look alot (substitute the your_project and your_username, and your_password markers with your own details) like this (in Postgresql format):-

    /* Drop and re-create the development database */
    drop database if exists <your_project>_development;
    create database <your_project>_development
        with owner = postgres
        encoding = 'UTF8'
        tablespace = pg_default;

    /* Drop and re-create the test database */
    drop database if exists <your_project>_test;
    create database <your_project>_test
        with owner = postgres
        encoding = 'UTF8'
        tablespace = pg_default;

    /* Drop and re-create the production database */
    drop database if exists rails_from_scratch_part_one_production;
    create database <your_project>_production
        with owner = postgres
        encoding = 'UTF8'
        tablespace = pg_default;

    /* Drop the user if they exist, and re-create them */
    drop user if exists <your_username>;
    create user <your_username> with password '<your_password>';

    /* Grant the user all privileges on the databases */
    grant all privileges on database <your_project>_development to <your_username>;
    grant all privileges on database <your_project>_test to <your_username>;
    grant all privileges on database <your_project>_production to <your_username>;

5) Go to the windows command line.  Navigate to where your newdb.bat file lives, and run it from there.  This will setup three project databases for you in Postgresql, one for development, one for test, and one for production.

6) If you have properly installed Postgresql properly, you can check the DB content from your PgAdmin console.  With Rails
2.1.0 this will create a table called schema_migrations in each of your three databases.  We'll come back to this soon once we've got tables to make.

6) Refresh your project in Aptana studio or whatever.  Now restart your server from the server list tab, or however you do it
and THEN click (or in my case double click) on "About your Application's environment". 

Hey Presto, you will now be presented with the environment, including the development database in which your project resides.

You are now up and running with postgresql and rails.

Monday 19 May 2008

Finalising WebSVN setup on Windows XP with Cygwin

You've got your WebSVN up and running, but you've not got all the features.  Why not? This is because the UI depends on a few programs that usually come with Linux/Unix distributions, and you'll need to make these available and turn these on for Windows XP.

So, the final step on Windows XP with WebSVN is to ensure all the tools are available, and here Cygwin will help you out.

I reckon, Cygwin is something you should probably have on your Windows box anyway, as it allows you to jump between a Unix-like environment and the Windows environment, doing the meaningful stuff as the problem dictates.  Any decent programmer should not need to choose between either flavour of OS tools, justset your box up for both.

You can pull Cygwin from http://www.cygwin.com/, and the key to setting it up so it has the tools WebSVN needs, is making sure you know how to use the setup installer to pick the right packages.

WebSVN relies (for its full features) on the following programs being available to the web app users via its file websvn/include/config.php:

  1. diff: With this we can enable the full diff functionality for versions of files.
  2. tar and GZip: With these two we can enable the tarball functionality that allows web users to get a ZIP/TAR of your code.
  3. enscript and sed: With these two we can enable syntax highlighting on the code in the repositories.  The type of files is defined in websvn/include/setup.php.  You might (like I did) add a couple of entries here for JSP and XML files (say fix them to type HTML) as otherwise these types will be interpreted as plain text which is not great, although this is not something you have to do to get this working.  Its a finishing touch.

Okay. From the cygwin setup program you get when you download and install it, you specify the set of packages/programs you'll want to include or add to your new or current Cygwin setup.  You'll need to include:

  1. The package diffutils you'll find in the utils section of the cygwin setup program once launched.
  2. The packages sed, tar, and gzip you'll find in the base section of the cygwin setup.
  3. The package enscript you'll find in the text section of the cygwin setup.

Okay, that's them done.  Clicking thru the cygwin setup will ensure these are installed.

Once done, you'll need to configure WebSVN to use these tools.

Go edit websvn/include/config.php under your htdocs location, and uncomment the appropriate lines to point to where these tools now reside.  My local file looks like this (it depends on where you installed cygwin too of course):

// We are not a linux box so we need to use
// cygwin toolkit exes
 
$config->setDiffPath("C:\\cygwin\\bin");
$config->setTarPath("C:\\cygwin\\bin");
$config->setGZipPath("C:\\cygwin\\bin");

// For syntax colouring, if option enabled...
$config->setEnscriptPath("C:\\cygwin\\bin");
$config->setSedPath("C:\\cygwin\\bin");

and make sure you enable the download feature by uncommenting:

$config->allowDownload();

and enable the colourisation/syntax highlighting of files by uncommenting:

 $config->useEnscript();

Now go startup the svn service, and startup apache from your XAMPP console (see previous blogs).

Go view the results, as now you'll have syntax highlighted, downloadable, and diff-able code at your local repo home http://localhost/websvn.

Done.

Wednesday 14 May 2008

Pretty-up your SVN repositories via the web with XAMPP

Note: Much of this is taken from the great blog entry at http://turnleft.inetsolution.com/2007/07/how_to_setup_subversion_apache_1.html, but with an XAMPP slant, so apologies for any repetition here.

No time?, read on:

1) Get and install XAMPP 1.6.3a as it comes with Apache 2.2.x.  This is big enough to be the topic of a separate thread.  But you shouldn't go far wrong if you follow the guide at http://www.apachefriends.org/en/xampp-windows.html.

2) Augment the XAMPP version of apache 2.2 with the Subversion specific libraries needed, available in the file svn-win32-1.4.6.zip you can get at http://subversion.tigris.org/servlets/ProjectDocumentList?folderID=91&expandFolder=91&folderID=74.  Do the following:

    a) Stop apache from your XAMPP control panel

    b) XAMPP has invalid pre-provided files mod_dav_svn.so and mod_authz_svn.so modules in xampp\apache\modules, replace them with the correct ones you'll find in the zip.

    c) XAMPP may come with invalid DLL for svn. Just in case, replace xampp\apache\bin\libdb44.dll and xampp\apache\bin\int13_svn.dll with the ones you'll find in the zip.

3) Now, configure your repository for web access via Apache.

    a) Edit C:\xampp\apache\conf\httpd.conf and add:

        Include conf/extra/httpd-subversion.conf

    b) Create http-subversion.conf in the extra subdirectory. 
    c) Populate it with details of your repository, and ensure the amended modules get loaded:

        LoadModule authz_svn_module modules/mod_authz_svn.so
   LoadModule dav_svn_module modules/mod_dav_svn.so

        <Location /svn/prototypes>
            DAV svn
            SVNPath c:/svn/prototypes
            AuthType Basic
            Options FollowSymLinks
            order allow,deny
            allow from all
            AuthName "prototypes"
            AuthUserFile c:/svn/passwords
            Require valid-user
        </Location>

4) Create the common web access password file for the repositories, and add a user.

    <path_to_htpasswd_under_xampp> -cb <path_to_svn_root_directory_less_drive_handle> <username> <password>

    e.g.

    c:\xampp\apache\bin\htpasswd -cb \svn\passwords whoever weRst194UUd

5) Check how we are doing by viewing the repositories over webDAV, by starting Apache again from the XAMPP control panel, and view the repository at http://localhost/svn/<repository_name>.  You will now need to use the user name and password to access your repository.

Note: So we are talking two password files, one under C:\<svn_root>\<repository_name>\conf\passwd for configuring SVN repository users who do checkouts etc etc on a particular repository, and one for all the online users who can browse repositories in C:\<svn_root>\passwords via using htpasswd generation above.

6) But wait, what about the pretty-up bit you promised? For this you'll need to stop using straight webDAV to display your repositories as its ugly.

    a) Note the "extra" stuff we added to the httpd-subversion.conf:-

        Options FollowSymLinks
        order allow,deny
        allow from all

    This is for our choice of repository web front end, WebSVN 2.0. 

    b) Ensure XAMPP Apache has the full PHP support needed for our choice of repository web front end.

        i) You can get PHP from http://www.php.net/downloads.php, go for the 5.2.6 windows installer, as its got the fixes missing in the build a few days earlier.

        ii) During install, select the Apache 2.2.x Module that allows the installer to update your httpd.conf file for XAMPP with the appropriate settings.

    c) Download the most recent ZIP package of WebSVN 2.0 from http://websvn.tigris.org/servlets/ProjectDocumentList. Unpack the files into xampp\htdocs and rename to websvn

    d) Finish the job by configuring WebSVN.  Rename xampp\htdocs\websvn\include\distconfig.inc to config.inc, and tell WebSVN its dealing with a windows host, and where the original svn "root" location under which all your repositories live happens to be, so uncomment and amend the entries:

        $config->setServerIsWindows();
        $config->parentPath("c:\\<path_to_your_svn_root>");

    e) Restart Apache, and you should now be able to access http://localhost/websvn to see all the repositories under your svn root using the nice display from the WebSVN people.

Done.